Showing posts with label Camera Repair. Show all posts

Monday, February 27, 2012

Agfa Isolette II

The Apotar 85mm, f4.5 is the middle range 3 element lens offering from Agfa. It fits between the cheaper Agnar and the deluxe 4 element Solinar.
Luckily the basic 4 speed + B Prontor shutter is working fine on my sample. But the focus ring was frozen by the dreaded green dried grease which practically cemented the front cell focusing element to the middle lens element ;(

I backed off the 3 set screws just enough and the front focusing ring unmounted without fuss. No need to remove the tiny screws, not easy to remount and there's a greater chance of losing them. Replacement screws of this kind are not easy to find.
Before attempting to remove the front lens assembly, I applied a few drops of Naphtha (lighter fluid) around where the middle element screws into the shutter lens mount and let it sit for 15-20 minutes.
Then I wrapped the front lens element ring with duct tape and then tightened a hose clamp around it. Note: judicious care should be observed in the tension of the clamp - just enough to grip and gain leverage! Beyond that, one runs the risk of cracking the lens elements.

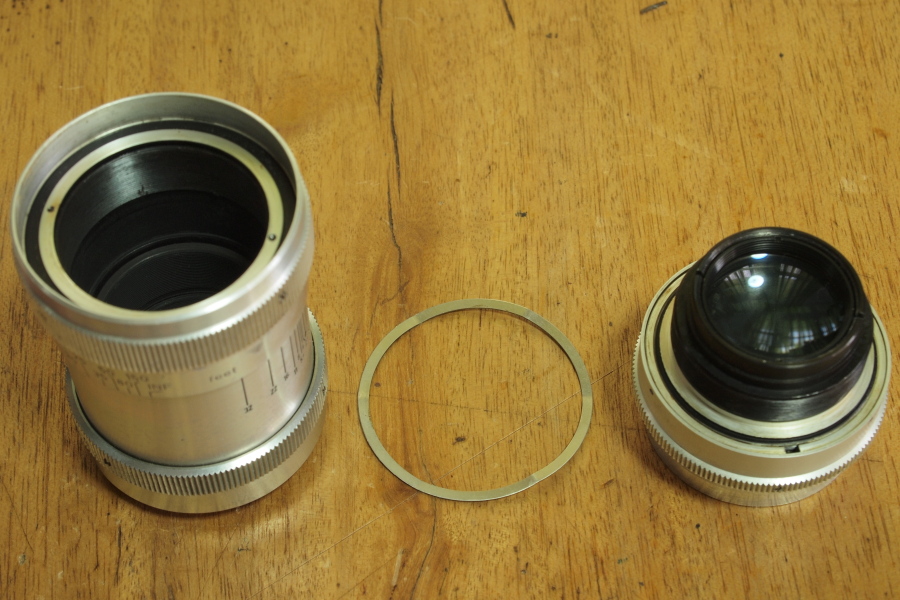
Once the two fused elements were out of the the shutter assembly, I soaked them in Naphtha contained in a 35mm film canister and exposed under the sun for 1 hour. After an hour and a bit of coaxing by hand, the two elements dislodged from each other. As pictured above, all the dried green stuff have to be cleaned out and then the threads re lubricated with lithium grease.

Collimating the lens
Camera mounted on a tripod, shutter held at B, 
in lieu of ground glass at the film plane I used three strips of magic tape, targeted distant objects 500 meters and beyond, focused the front lens element for maximum sharpness magnified through a viewing loupe.
Next time I will try Rick Oleson's two camera method.

Remount the front focusing ring at the infinity mark.

So far, so good but was anxious to shoot and forgot to inspect the bellows extensively for light leaks.
Leaky bellows is another Isolette affliction ;(

After seeing frames with symptoms of light leaks, I went into a dark room at night and shined a flashlight through the back and bellows of the Isolette. Found a few pinholes at the corners of the folds and a missing tiny screw on the side of the lens assembly was letting light through also. A replacement screw was found in my junk box. I used textile paint to seal the light leaks as a temporary fix. I reckon that with constant folding and unfolding, the textile paint fix will not hold. So I contacted Sandeha Lynch for replacement bellows.

Stay tuned...


Saturday, June 11, 2011

Crooked frames in a Barnack?


I've had this problem for years and have read modern film cassettes are 2-3mm shorter causing the image to slant and/or intrude into the sprocket holes in early Barnacks and clones. With a packet of
 stick-on green felt pads sitting in my drawer, I stuck one in the base plate lock and it worked! I did it to all my Barnacks which had this issue.


Not my original idea, credit should go to this post.


Wednesday, June 1, 2011

Steinheil-Munchen Culminar VL 85mm, f2.8 LTM

DIY CLA

Typical user sample with front element cleaning marks, mild haze and some dust specs. I shot a few frames and this was the best I got. I suspected the susceptibility to flare and muted colors (like the shot below) was due to the haze.

Before cleaning @ f4

Dismantling is pretty straight forward - remove the lens head from the focusing mount.

Rear element taken off

Cleaning the haze from the middle element

Front element off

Reverse the procedure for re-assembly

After cleaning @ f4


Steinheil LTM lenses were offered by Sears Roebuck in the 50s as cheaper alternatives to Nikkor for their Tower (Nicca) RF cameras. 

Friday, April 29, 2011

Canon Serenar f1.8, 50mm LTM lens


This Serenar 50/1.8 came as a body cap on a Canon IVSB2 acquired at a camera show in late '97. It had dust specs, haze, front element cleaning marks and fine scratches. The result from a trial roll was discouraging. I could not find the proper 50mm lens in the ensuing camera shows, instead  I ended up with a minty  Serenar 35/2.8 with matching view finder in its original leather case.


 After shooting a few more rolls, a cousin became really interested in this Canon RF system. Since I was contemplating the purchase of a used Leica M6, I sold the lot with a right of first refusal clause if he decides to unload at a later date. He enjoyed it for several years using an Elmar E39 50/2.8 LTM and the Serenar 35/2.8.

Fast forward to last December, he was trimming down his RF collection and I got the outfit back. Meanwhile  I've read many good things about this Planar design at Rangefinder forum and Dante Stella considers it at par with the original Leitz rigid Summicron.


My curiosity was piqued and searched for information on how I can get rid of the dust specks and haze. I found a post at Rangefinder forum  (can't find the exact link) describing disassembly which starts at the rear retaining ring...


The whole optical module comes off the focusing helical


Be careful not to scratch the glass...


Fortunately the middle lens element was within the torque ability of my heavy duty tweezers ;)


The aperture blades were dry and the click stops turning smoothly, just cleaned out dirt and sparingly relubed with lithium grease.


I discovered edge separation in the cemented pair middle lens element, not very encouraging...


Everything cleaned and lubed. 


Ready for a test drive...

Bessa R
Acros 100/Diafine
Bessa R
Acros 100/Diafine
Leica M3 + M adapter
PX125/Diafine
Shot @ f1.8...not too worried about the balsam separation ;)

More Serenar 50/1.8 pics